


 Free Shipping
 60 Day Trial


How to Shave & Define Your Beard Neckline

You can grow the greatest beard but still look unkempt. A poorly defined neckline will do that to you. Defining your beard neckline well comes down to knowing where the line should sit, which tools to use, and how to shave cleanly below it.
Here, you'll find everything broken down step by step, so you can handle your beard neckline at home without second-guessing every pass.
Why Your Neckline Makes or Breaks Your Beard
A neglected neckline can make even well-maintained facial hair look messy and unintentional. Getting it right can:
- Add thickness. The hairs beneath your jawline act as a foundational backing for the beard above. They're what give it density and volume from the front. Trim that area too high and the beard looks thin and patchy, even if the rest of it is in great shape.
- Define your jaw. A clean transition from neck to chin frames the face and makes the jawline read as stronger and more prominent. For men with a softer jaw, a well-placed neckline makes a real difference.
- Prevent a chin strap. Shaving the neckline right along the jawbone (one of the most common mistakes) strips the beard of its foundation and leaves you with a disconnected, artificial look that draws attention for the wrong reasons.
The neckline belongs on the neck, and getting it there starts with the right setup.
What You'll Need to Define Your Neckline
You don't need a full barber kit. But what you do need is:
- A beard trimmer to handle the edge work.
- A razor or electric shaver to clear everything below the line.
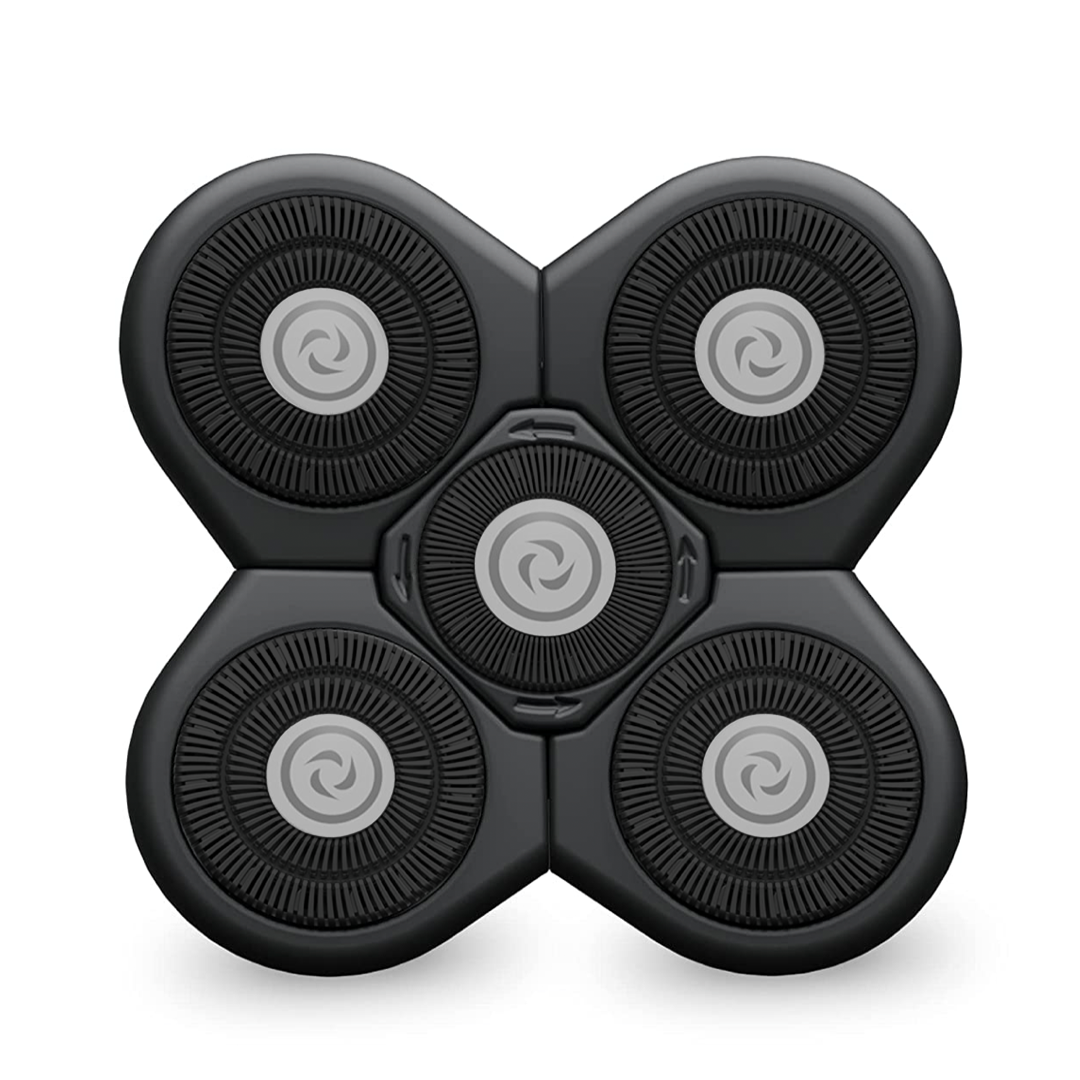
For the shaver, rotary is the better choice for the neck. The circular heads follow the curved contours of the throat more naturally than foil and tend to deliver a closer result.
If you'd rather keep it simple (as most of us do in life), a versatile electric shaver kit with swappable attachments handles both jobs. The BaldiePro™ Head Shaver Kit includes a Precision Hair Trimmer attachment alongside the shaver head, so you can define the line and clean below it without switching between tools.
Beyond that, you’ll also need:
- A small hand mirror for checking symmetry from the side.
- A pre-shave oil or gel to protect the neck.
- A moisturizer or aftershave serum for after.
The "No Hair, Don't Care" Bundle covers the full list: electric shaver with attachments, Natural Pre-Shave Oil, and Aftershave Serum, all in one.
Where Should Your Beard Neckline Actually Be?
Your beard neckline should be above the Adam's apple, well below the jaw. The center should sit roughly 1–2 finger-widths above the Adam's apple and curve upward toward each ear from there.
Most men default to trimming too high, like right at or near the jawline, which makes the beard look like a chin strap and cuts the fullness it needs at the base.
The Two-Finger Rule
Place 2 fingers flat and horizontal just above your Adam's apple. The top edge of your upper finger is your starting point.
From there, trace an imaginary U-shape upward toward each earlobe, following the natural shape of your jaw while staying well below it.
With a shorter beard, stay close to the two-finger mark to keep things tidy and defined. If you're working with a longer beard, you can bring the neckline down slightly — the extra length on the neck adds fullness and stops the beard from looking thin at the base.
How to Shave and Define Your Beard Neckline: Step-by-Step
Step 1: Find Your Starting Point
Follow the Two-Finger Rule as above. Mark this center point with a quick trimmer pass.
Step 2: Prep Your Skin
Wash your face and neck with warm (not hot) water so it softens your hair and reduces drag. If you're shaving clean below the line, apply a pre-shaving oil or gel to the neck area, which can help prevent irritated skin. It might feel like the last thing you need in your grooming routine as a busy man, but prep is super important.
Step 3: Trim and Define the Line
Switch to your beard trimmer for this step, or the Precision Hair Trimmer attachment if you're using the BaldiePro™. Set it to a low guard, or no guard for a sharper edge.
Work from the center point outward toward each ear, following the U-curve from Step 1 with short strokes and frequent mirror checks. Take off less than you think you need to; you can always remove more, but you can't put it back.
Step 4: Shave Below the Line
Swap to your rotary shaver head now, or the main BaldiePro™ Blade if you're using the Kit.
Clear everything below the edge you set, working downward in short passes with the direction of hair growth.
Shaving-related skin problems, including irritation, razor burn, and ingrown hairs, are closely linked to technique and skin prep. So rinse the blade frequently and keep the razor below the line.
Step 5: Rinse and Moisturize
Finish with cool water, pat dry, and apply a moisturizer or your aftershave serum to the shaved area right away. The neck skin is more sensitive than your face, particularly the strip just above the Adam's apple. Skipping aftercare here means skipping the step that keeps the skin under your beard as clean as the beard itself.
4 Common Neckline Mistakes (And What They Look Like)
- Setting the neckline too high. The most common error, and the hardest to recover from. A neckline on or near the jawline looks like a chin strap from the front and strips the beard of fullness from the side.
- Cutting a straight line instead of a curve. A flat horizontal cut from ear to ear looks harsh and unnatural. Your neckline should follow the curve of your jaw (a soft U-shape), and not a ruler line. From the side, the difference is immediately obvious.
- Removing too much at once. One fast, guardless pass can push your neckline too high before you've had a chance to check the mirror. Work in small passes, step back after each, and only remove what you're confident about.
- Skipping aftercare on the neck. To keep the neckline sharp, you'll likely be shaving this area every few days, more often than the skin under your beard sees a trimmer or shaver. That regular exposure adds up. Irritation and ingrown hairs are largely preventable with a quick post-shave moisturizer or serum. It takes under a minute and makes a visible difference.
Frequently Asked Questions
How Often Should You Shave Your Neckline?
Every 2–3 days for most men. The neckline is where new growth shows up most visibly, so a few days of stubble below the line softens the edge fast. Short beard? You may need to tighten it every other day. Longer beard, once or twice a week is usually enough.
How Do You Tell if You Have a Neckbeard?
A neckbeard is beard growth that extends down the neck without a defined upper boundary. There’s no clear edge between the beard and the throat, often sitting close to the collar. The fix is to define a neckline with the two-finger rule and keep the skin below it shaved clean.
Should I Define My Neckline Before or After Trimming My Beard?
Define the neckline first. Setting the lower boundary before you work on length or shape gives you a fixed anchor. The rest of the trim follows from there. If you trim the beard first and take off more than planned, you risk repositioning the neckline to compensate, which throws off the whole shape.
A Clean Neckline, Every Time
A well-defined neckline is a small habit with a big payoff. Once you know where to set the line and how to keep it, the whole process takes minutes.
If you want a tool that handles both the edge work and the clean shave below in a single session, the BaldiePro™ Head Shaver Kit is built for exactly that; wet or dry, with SmoothShave™ technology designed to cut close without irritation.
References
- Sukakul T, Bunyaratavej S, Chaweekulrat P, et al. (2021): Facial hair shaving behavior and skin problems of shaved areas of males. Journal of Dermatology, 48(9), 1409–1413. Available at: https://pubmed.ncbi.nlm.nih.gov/34254359/